This information
is offered in the hope that it will aid some of our readers in understanding
the nature of wooden aircraft construction.
We emphasize
that this piece is intended as an overview, not a Construction Manual
or "How To" article. Specific information, such as should
we or should we not sand a piece of plywood in the area where it
will be glued to another member, is typically found in the Construction
Manual for the kit. Several excellent publications are also available
from the EAA Library. Your lot supplier will willingly supply you
with addresses and phone numbers.
Right off the
bat with wooden kits you often have the choice of plans building
or kit building. Available expertise, equipment, building technique,
and working space are all ingredients in figuring out your direction.
Expertise
Wood is a most
user friendly material for building kit airplanes. Wood structures
do not demand the close tolerance fits and elaborate alignment fixtures
that other methods do. Building a wood aircraft does not demand
the investment in specialized shop equipment, nor the need to acquire
new skills typical of other materials. In general, if a prospective
builder can maintain the things around the house that need maintenance,
he or she has the necessary skill and the tools required to successfully
complete a wood and fabric aircraft project.
Building from
plans or kit will vary what is required of your expertise and the
tools you will need.
If you plan
to "plans build," first you need to understand how to
read and grade wood. Obviously, you need to know the type of wood
you're looking at. The more common woods in wooden aircraft are
Spruce and White Pine. Some Firs and Ash are not uncommon. Once
this is established there are certain characteristics the wood should
have. The wood should be free of knots and major deviations in the
grain. You may be able to work around (or cut out) bad areas.
The next thing
to at will be the grain density or "rings per inch". Generally,
there should be at least six to eight grains or rings per inch.
Ten to twelve is usually better
Grain run out
is another important aspect. This is a ratio of how far the grain
runs as it deviates from a straight line. 10:1 means for every ten
units (inches of length) the grain strays one unit (inch) from a
straight centerline. Airplanes generally like at least 12:1. Of
course, the straighter (less run out) the better.
Be sure to
note these things as you look at various planes (or kits) to help
you determine the level of quality you demand
There are other
things like moisture content and specific gravity that the engineers
look at. You probably don't need to be too concerned with these
unless the wood has been living in an extreme condition of very
high humidity (which could affect the weight) or in an unusually
hot and dry environment (which could make the wood brittle and weak).
Another concern
for the plans builder is an ability to source the items in the plans.
This includes where to look for which materials, in what quantity
they are available, and how they are shipped. Once you know these,
your creativity will likely affect price.
If the previous
paragraphs made you feel a little uneasy, you may want to consider
building from a kit instead of plans. In so doing, you eliminate
a time consuming and potentially error ridden processes involved
in building an aircraft - that of material location and selection.
Materials
If you are
dealing with a reputable kit manufacturer, the materials supplied
in the kit will be carefully selected, continually tested, and inspected
for defects.
 Plywood
and other parts supplied in your kit should be subject to the same
scrutiny as the "plank" wood just described. By dealing
with a reputable company, you will be comfortable that the material
you use is indeed suitable for the purpose. Hopefully your kit supplier
has also invested many, many hours in structural analysis of the
finished aircraft. Ask if you can obtain a copy of it. This relieves
you of the concern over its safety. As a kit builder, you need only
use the material in the kit (before you decide on a kit find out
exactly what does and does not come with the kit - you may be surprised!
), assemble that material according to the plans, and the integrity
of the finished product will be increased.
Plywood
and other parts supplied in your kit should be subject to the same
scrutiny as the "plank" wood just described. By dealing
with a reputable company, you will be comfortable that the material
you use is indeed suitable for the purpose. Hopefully your kit supplier
has also invested many, many hours in structural analysis of the
finished aircraft. Ask if you can obtain a copy of it. This relieves
you of the concern over its safety. As a kit builder, you need only
use the material in the kit (before you decide on a kit find out
exactly what does and does not come with the kit - you may be surprised!
), assemble that material according to the plans, and the integrity
of the finished product will be increased.
Equipment
Plans building
will require more specific tools than kit building. A pretty good
table saw and/or radial arm saw with table extensions and guides,
and planer are the most critical tools the plans builder would need
beyond a kit builder.
Otherwise,
simple hand tools are all that's really needed. You probably have
most of what you need such as some "C" clamps, but you'll
be amazed to discover that, in many places, a modified clothes pin
makes a good clamp. The epoxy resin supplied in kits does not require
huge amounts of pressure to yield a good glue joint. You will need
a small staple gun (hand operated) and lots of staples. You'll need
some kind of staple puller (you can make one out of a bearing scraper
or screwdriver), unless you don't pull the staples. You can do it
either way. The only staples that must be pulled are those that
will be in contact with the fabric. You'll need some sort of sander
- block, disc, belt.
Among the neat
things to own, but not necessary, are a drill press, a small table
saw, and a small band saw. An electric or air operated stapler is
nice, but not necessary. All of the operations required can be accomplished
without these -- it just takes a little longer.
Work
Space
How much shop
space do you need for this project? The obvious answer is, the more
the better. And it would be keen if this huge shop was as bright
as day, heated, air conditioned and the like - but, that's not necessary.
Many builders are presently building great planes in one half of
a two-car garage, and can still put the car in at night.
Construction
Technique
As a first
time kit builder, you will learn a little bit about reading plans.
The size of the drawings directly relates to how much detail is
provided and therefore how easy the plans are understood. Written
text or construction notes which complement the drawings are a great
benefit.
You will likely
need a workbench on which all is built. Imagine the biggest single
part of the plane. That's about the size of the bench. Two 4' x
8' sheets of ply or particle board make a typical bench 4' x 16'
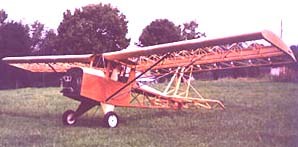
Now, let's
consider building a wing rib for a popular wooden kit offered as
both kit and plans, the JDT Mini-Max. In doing so, we can introduce
some terminology, and also show how the entire aircraft is built,
piece by piece.
Since a rib
must be an exact shape, it is built over a full size drawing furnished
with the plans. In this case, we are only using the drawing to construct
a simple fixture. The ribs built in this fixture will all be the
same size .
The rib fixture
should be built on a flat board about 12 inches wide and 50 inches
long. This will allow the builder to move it around as required.
The rib drawing is laid out on the board and secured at the edges.
Then it is covered with clear plastic (unless a Mylar template is
used) to prevent glue squeezed out from sticking to the pattern.
The upper and
lower horizontal members of the rib are called "caps"
and are 1/4" square pine. The lower cap is straight and held
in position over the drawing by nailing small blocks at appropriate
locations to hold it in position. The upper and lower caps can be
cut to length on assembly or left long at the front of the rib and
trimmed later.
The upper cap
is now located over the drawing. This one is curved in shape but
is still secured in the same manner. The vertical and diagonal members
are now cut, fitted and glued in position over the drawing.
The joint attained
where the vertical and diagonal members meet the cap strips is called
a "butt" joint, and, by itself, has little structural
integrity. This joint is, therefore, reinforced by the addition
of a "gusset", which is cut to shape from light plywood,
and glued in position over the outside of the joint. Staples are
driven in appropriate positions to hold the gusset until the glue
cures.
Gussets come
in various shapes and sizes throughout the aircraft structure. The
light plywood from which they are formed is very easily cut with
tin snips.
In some areas,
such as fuselage sides where further strengthening of butt joints
is required, members known as "corner blocks" are cut
to fit, and glued in place on one or both sides of the butt joint.
This whole area is then overlaid with a gusset, yielding a glue
joint with great strength! We have seen welds broken at the weld
in welded aircraft, and rivets popped out of aluminum aircraft,
but never. even in a wrecked wood aircraft have we seen one of these
joints broken.
Back to our
rib. When all the gussets are stapled in place, the rib may be immediately
removed from the fixture and set aside to cure. Ribs can be built
one behind the other in this fashion, as quickly as you want to
work. Gussets are cut and glued to the back side of each rib at
your convenience.
A finished
rib of this type weighs just ounces. When installed in the wing
and supported by spars and other structure, it is infinitely stronger
than it needs to be to withstand any flight loads you might possibly
inflict on it. While it is made of different material, this rib
is the same type of structure that is used in the construction of
wooden railroad bridges!
The entire
aircraft is built in the same manner as that just described -- one
subassembly attached to another. until a complete aircraft emerges
from your shop. There are holes to drill and parts made to fit together
and work. With wood, it's very difficult to make a mistake that
cannot be easily rectified. In what other type structure can you
drill a hole in the wrong place and, when the error is discovered,
simply plug the hole by gluing in a piece of dowel, then moving
over and re-drilling the hole in the proper location, without weakening
the structure?
You may have
an impression at this point that nothing about this project is cast
in stone, and in a sense, that is true. That's part of the beauty
of wood aircraft construction. Shop temperatures are not extremely
critical, and precisely how you elect to do a particular operation
is up to you. The important thing is not how you do it, but that
the finished product is exactly as shown on the prints, with nothing
added and nothing left out.
 Whether
you build from plans or from a kit, few rewards in life can match
the pride attained from building your own aircraft, and few companies
can match JDT Mini-Max's experience and proven aircraft designs.
Whether you are a first time builder or an experienced craftsman
you will appreciate the quality and support afforded to all of JDT Mini-Max's
products.
Whether
you build from plans or from a kit, few rewards in life can match
the pride attained from building your own aircraft, and few companies
can match JDT Mini-Max's experience and proven aircraft designs.
Whether you are a first time builder or an experienced craftsman
you will appreciate the quality and support afforded to all of JDT Mini-Max's
products.